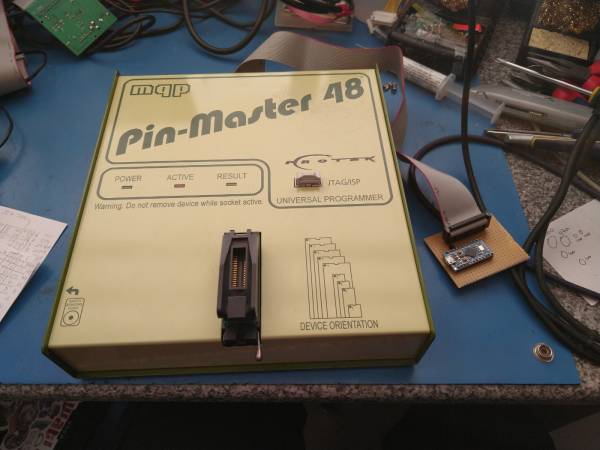
MQP Pin-Master 48 device programmer
The Pin-Master 48 is a 1990s-era universal device programmer. Like many programmers of its era, it uses a parallel port interface. Somewhat unusually, there was a USB adapter made for it in the early 2000, which was later cloned as an open-source project.
I picked this up on ebay to use for programming older devices which my Galep-5 doesn't support, and to see if it was possible to add support for new devices to it.
My eventual goal is to add support for reading 68HC705 microcontrollers using the technique employed by Stag in the 68MR00 adapter (Non-User Mode readout).
Issues
The PM48 is a fairly old and slow programmer, and while it claims to program e.g. Texas Instruments fuse-link PROMs, I've found that it doesn't work correctly. I've approached MQP about this, who insist it works and I must be doing something wrong – this is possible. It's also possible my devices are junk. But the MQP also doesn't program my Signetics fuselink PROMs, which my GALEP and BP-1200 can program without issue…
I'm not comfortable blaming this entirely on MQP, but if you're in the market for a programmer for older devices, I'd suggest looking for a BPM Micro 1200 with the adapters as it's a much more versatile unit with better device support. I have one and it's ended up completely replacing the Pinmaster.
Installing the software
The parallel interface will only work on Windows 95, 98 and XP. It requires a driver (MQPPORT) which is usually installed by the PROMDRIVER software. Unfortunately the current version of PROMDRIVER (as of October 2021) seems to have an installer bug which stops the driver from being installed.
To work around this:
- Download this 1998 version of PROMDRIVER and install it.
- Download the latest version of PROMDRIVER 'pre-Vista' and install it. Replace the previous version.
- Reboot.
- Run PROMDRIVER. Turn the programmer on and tell PROMDRIVER to connect over the printer port.
Building a USB adapter clone
Sven Schnelle has made an Arduino based clone of the MQP adapter. This is very easy to build, and uses a 5V 16MHz Sparkfun (or clone) Pro Micro.
The wiring is as follows:
| pin | pin | ||
|---|---|---|---|
| - | 1 | 24 | - |
| - | 2 | 23 | GND |
| GND | 3 | 22 | - |
| GND | 4 | 21 | - |
| Select (DB25-17) | 5 | 20 | D0 (DB25-2) |
| Init (DB25-16) | 6 | 19 | D1 (DB25-3) |
| Strobe (DB25-1) | 7 | 18 | D2 (DB25-4) |
| AutoLF (DB25-14) | 8 | 17 | D3 (DB25-5) |
| Select (DB25-13) | 9 | 16 | D4 (DB25-6) |
| PaperEnd (DB25-12) | 10 | 15 | D5 (DB25-7) |
| Busy (DB25-11) | 11 | 14 | D6 (DB25-8) |
| Ack (DB25-10) | 12 | 13 | D7 (DB25-9) |
GND connects to pins 18 to 25 of the DB25F.
If you build this, you don't need to use the convoluted installation process – just install the latest Vista version of PROMDRIVER.
Under the hood / Teardown
I posted a teardown of the Pinmaster 48 on Twitter: https://twitter.com/philpem/status/1447602333345517570/photo/1
The chip on the top board is a Xilinx XC3030A-PC84, 7C speed grade.
The Xilinx XACT software used to produce designs for the XC3000A series has made its way onto archive.org, with patches to remove the need for a dongle: https://archive.org/details/1995-1996-xilinx-xact-520-600-601
